1 Introduction to SDSF

There is going to be a lot of stuff going on on the mainframe systems and that's going to create a lot of logs
SDSF can be very helpful in going through them and can help with filtering, sorting etc.

Many people with many roles in the datacentre will all use SDSF in order to obtain information they need for debugging and / or monitoring.

Introduction

SDSF - System Display and Search Facility is a utility on the z/OS systems that can allow you to go through the various types of logs on the z/OS system, including logs from different systems within a Sysplex.
It's a window into the z/OS system (or sysplex) that provides the data centre personnel the information they need to perform all of their day-to-day duties.

There are many things that can be monitored from within SDSF

  • Activity related to job input / output, Started Tasks, TSO users
  • Devices and system resources
  • JES devices

While at first SDSF was only available for systems operating with JES2, z/OS 1.10 has introduced the ability for JES3 systems to also make use of SDSF.

The notes here will provide information for JES2 systems only

Some of the things you can do with SDSF include

  • Print job output
  • Display details of an active TSO user
  • Search for information in the system log
  • Cancel a job that is executing

As a quick reminder this is the general outline of how the JES2 process works:

JES 2 provides the facilities to ensure the jobs submitted are processed efficiently.

There are Checkpoints that ensure recoverability, RJE (Remote Job Entry) and NJE (Network Job Entry) systems for load sharing, spooling and monitoring for the job activity.

JES2 has a rich set of commands that can be entered at any console, or if you have the authority, via SDSF

JES2 commands need to be prefixed by a dollar sign `---

There is going to be a lot of stuff going on on the mainframe systems and that's going to create a lot of logs
SDSF can be very helpful in going through them and can help with filtering, sorting etc.

Many people with many roles in the datacentre will all use SDSF in order to obtain information they need for debugging and / or monitoring.

Introduction

SDSF - System Display and Search Facility is a utility on the z/OS systems that can allow you to go through the various types of logs on the z/OS system, including logs from different systems within a Sysplex.
It's a window into the z/OS system (or sysplex) that provides the data centre personnel the information they need to perform all of their day-to-day duties.

There are many things that can be monitored from within SDSF

  • Activity related to job input / output, Started Tasks, TSO users
  • Devices and system resources
  • JES devices

While at first SDSF was only available for systems operating with JES2, z/OS 1.10 has introduced the ability for JES3 systems to also make use of SDSF.

The notes here will provide information for JES2 systems only

Some of the things you can do with SDSF include

  • Print job output
  • Display details of an active TSO user
  • Search for information in the system log
  • Cancel a job that is executing

As a quick reminder this is the general outline of how the JES2 process works:

but this can be substituted for another prefix.
For example a command to display a job with the ID of 18332 would be $DJ18832

There are special JES2 control statements that can be added to JCL overview, to allocate or change default values. In this case, the JCL line must start with /^ instead of the usual //

Most jobs will be submitted to JES2 through TSO or a scheduling package and will be sent to an internal reader, however RJE and NJE can also be used!

It's important to note that the jobs are not necessarily processed in the order that they are received in. The order of the jobs will depend on what class of JES2 Initiators are available and the priority of the jobs submitted. Only when two jobs have the same class and priority and would be "fighting" for an initiator does the time of submission come into consideration.

A batch job will usually create two types of output. One relating to reports or data produces by the user program, while the other has system information that is related to the processing of the job itself.

Each submitted job will be assigned a unique job number that it will keep until it is purged from the system.

Starting JES2

Normally, a JES2 start is specified in the IPL parameters and starts automatically. If the JCL procedure used for starting JES2 does not contain start-up options then you might be given a WTOR message like this

* id $HASP426 SPECIFY OPTIONS - JES2 z/OS 2.5 SSNAME=JES2

When broken down

  • * indicates that a response is required
  • id will be the reply ID
  • 426 will be the message serial number
  • SPECIFY OPTIONS is the message text
  • JES2 z/OS 2.5 SSNAME=JES2 is the version and name used by the system to start JES2

Each site will have a standard reply to the Specify Options message in their procedures manual
Some of the more common ones can be seen below:

  • NOFMT
    • No spool volume is to be formatted unless JES 2 determines that formatting is necessary
  • FORMAT
    • All spool volumes are to be formatted. This is only honoured if all other processors in a JES2 MAS configuration are inactive. If this option is taken, everything on the spool will be lost. If you specify this option, it will cause a cold start of JES2
  • WARM
    • JES2 is to continue processing where it left off. This is the normal and preferred startup option
  • COLD
    • All job data on the spool volumes will be lost. This is usually only at the request of a systems programmer - some changes to JES 2 require a cold start.
  • REQ
    • JES2 is to stop and will require a $S command before beginning job processing
  • NOREQ
    • Specifies that JES2 should start processing once it is initialised. This saves the operator from needing to issue a $S each time it is initialised.
  • CHECK
    • Specifying this option will instruct JES2 to run the data set checker that is run at initialization , but not actually start JES2. This is useful for testing new initialization statements and looking for errors in them

When not started at IPL, JES2 can be started from the console (with an MVS command)

S JES2

This will likely result in the need for one of the WTOR responses outlined above

For example

R 01,WARM,NOREQ

The completion of the JES2 startup cna be shown by the message $HASP492

if the REQ option was specified, then a $HASP400 ENTER REQUESTS message might appear. This will allow the operator to issue $S to start JES2 processing.

Starting JES2 in a MAS environment

When the first system has started EJS2 the startup of the subsequsnt members will be changed from a warm start to a quick start.

A quick start is similar to a warm start, where the output remains on the spool, but the job queue and output tables are not updated - making the startup faster.

Stopping JES2

Stopping JES2 processing without stopping JES2 iteslf

If you need to stop JES2 processing, but not shut it down (for example allowing it to continue accepting jobs on the internal reader) you can issue $P command.

This will stop all of the initiators, printers, punches, transmitters after they complete their current activity.

Even though no new work is allowed, JES2 will accept new jobs (and hold them)

Graceful shutdown of JES2

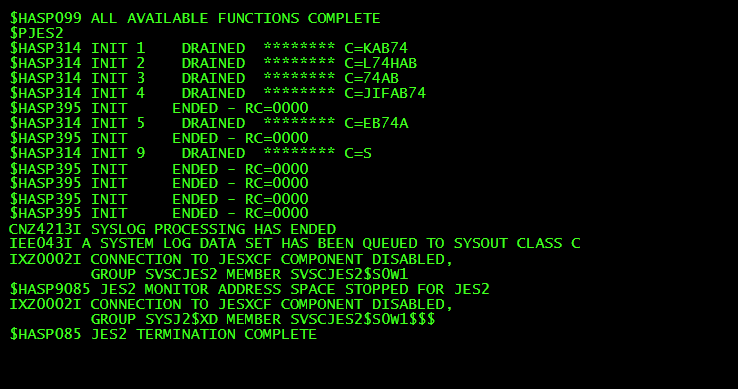
To gracefully shut down JES2 you can issue $PJES2
If there is any job processing that is ongoing or any devices are active JES2 will display information that JES2 cannot be removed because of it. If you have the authority, you can issue commands to attempt to end it.

Below are some messages that you might see when issuing $PJES2

Pasted image 20241207190835.png

Abnormal shutdown

Sometimes a clean shutdown of JES2 will not be possible

When some error conditions precede the shutdown of JES2, such as SQA shortages, there may be tasks left active on the system.
There are a few commands that can be used to terminate JES2 in an abnormal way

$PJES2,QUICK
$PJES2,TERM
$PJES2,ABEND
$PJES2,ABEND,FORCE

Those should be used after all other avenues of making the system dormant have been tried and found to be not effective.

QUICK will terminate JES with no regard for cross-system activity. It would be used when cross-system activity cannot be terminated normally. $DJES2 can be used to show cross-system activity

If JES2 still does not shot down you can use $PJES2,TERM this will allow the termination to disregard any active tasks. This will make it impossible fora warm start to happen, meaning that this should only be used where the system is to be re-IPLed

If somehow both of those options fail you can issue ABEND. This will terminate JES2 immediately and can be used to terminate JES2 and perform a hot start without an IPL when the need arises. The only activity that will be waited for is the completion of writing to a checkpoint, where this is based on a coupling facility.

After this, a WTOR message will likely be displayed, asking what type of abend should be performed. The responses to this include

  • END - a standard abnormal end
  • END,DUMP - a standard abend with a dump
  • END,NOHOTSTART - an abbreviated abend, does a minimal amount of cleanup, meaning an IPL will be required instead of a hot start.
  • SNAP - will redisplay the WTOR
  • DUMP - will just request a system dump.

ABEND,FORCE is your last resort. its results are unpredictable, it will likely damage JES2 resources, such as checkpoints. It should only be issued if you're going to be re-IPLing the system. You need to attempt a regular abend before, the system would not let you issue a forced one without tryin a normal one first

Sub notes

The SDSF interface can be used to easily interact with jobs in many places on the JES2 process

Contents

The SDSF menu has many entries and it shouldn't be hard to see how some of them correlate to the JES2 process

  • DA
    • Displays jobs that are currently being processed
  • I
    • Displays the input queue - the jobs that have been submitted to the system, including held jobs that you can release
  • O
    • Displays the output queue - things from the jobs that have finished processing
  • H
    • Displays the held output queue
  • JG
    • Displays information about jobs that are related to each other within a group

Some other entries in the menu allow you to manage more things:

  • PR
    • Allows you to view and manage printers in the system
  • LINE
    • Allows you to view and manage the status of JES lines
  • NS
    • Allows you to view and manage the LOGON and NETSERV devices

The menu also includes various system and resource management entries

  • RM
    • Resource monitor shows the JES2 resource usage such as TGs (Track Groups), JOEs (Job Output Elements) and JQEs (Job Queue Elements)
  • LNK
    • Provides information on Link Data Sets
  • PARM
    • Provides details on the PARMLIB data set concatenation
  • PROC
    • Displays the procedure libraries used by JES2 and the procedure library sequence concatenation

Most of the notes here will deal with the interactive version of SDSF, however this is not the only way that you can interact with it.

Accessing and using SDSF

Apart from the interactive version, you can also access SDSF in the following ways

  • Batch jobs invoking the SDSF or ISFAFD programs
  • Through the REXX programming language
  • Through the Java programming language

As mentioned, batch jobs can be used to invoke SDSF, for example to avoid losing time by retyping the same SDSF commands for commonly performed tasks.
JCL can be defined to use either the SDSF or ISFAFD utilities, with the main difference between the two being that ISFAFD accepts overtyping the commands and the us of the PF keys.

The ability to use REXX programs to interact with SDSF was introduced in z/OS 1.9 while the ability to use Java was introduced in z/OS 1.12

The interactive version of SDSF can be accessed directly from TSO using the SDSF command, however it is recommended to use ISPF and select the appropriate item there.

Let's now go over things within the SDSF menu

SDSF menu

How the SDSF menu will look for you after you start it will depend on the authority that was assigned to the user ID you are using and not all options might be available for you.

As the SDSF menu is hierarchical, not all options will be available from the first, topmost menu, and some options might be available from multiple entries in that top menu.

When in the menu, you can use TAB to move your cursor to the option you want to enter and press ENTER.
Alternatively, you can type the name of the option into the command line, and enter that way.

Most of the data in SDSF will be presented in the form of a table with each row being one entry, consisting of many columns.

Pressing ENTER will refresh the data on the screen.

Columns

The columns that are displayed by default when you first enter SDSF are called the primary field list.

You can use the ? command in order to see the alternate fields that were configured for this SDSF panel. After entering the command, some columns will remain in place, while the new, alternative columns will be displayed on the right and highlighted. Entering the command again will revert to the primary columns

in a Sysplex environment, activity from multiple systems will be shown together, with the SYSNAME column showing which system the entry belongs to.

Colours within the columns

  • White
    • by default this indicates that the item is currently active
    • Fields within this item that are RED can be overtyped
  • Blue
    • This indicates that the item is not performing any activity
    • Fields within this item that are GREEN can be overtyped

Pop-Up boxes

If SDSF is ran under ISPF, many commands can be entered that will display a pop-up box that will contain more information and sometimes allow for things to be changed or defined in an interactive way.

For example ARRANGE ? will display a the popup.
Most of the commands that will display a popup are with the ? sign.

if incorrect values are entered in the popup box, it should display an error message and give you a chance to remedy the incorrect values.

Action bar and SET SCREEN

Apart from the command line, the action bar at the top of the screen can also be used to interact with the SDSF.

To interact with it, you can place the cursor over the items on it and press ENTER. Depending on the setup, you might be able to use the mouse to achieve this as well.

Doing so should open a popup for the selected action bar item. Within that popup you can place the cursor on one of the options, or type the number next to it and press ENTER in order to select it.
Note: If the number next to an option is replaced with an * this usually indicates that this option cannot be selected right now. If an option ends with ... then selecting it will display another popup prompting you for more information.

Most of what can be achieved with the action bar can be achieved with typed-in commands, and you might want to disable the action bar in order to give more space for the actual entries to be displayed.

To open a popup that will allow you to disable the action bar, you can enter the SET SCREEN command.

This pop up also allows you to customise the default point-and-shoot settings

To edit the colours, highlight and the intensity of the entries being displayed, the same SET SCREEN command can be issued.
The lower part of the popup will contain separate settings for the Colour of the text, the type of highlight to be used and the intensity. Separate settings can be applied to

  • Title line
  • Command input line
  • Column headings
  • Message lines
  • Information lines
  • Different types of input and output fields.

If you need to restore a value to the default, simply erase the current value.
The F5 key can be used to refresh the window content and ENTER can be used to confirm any changes

For example the top line with the paging, I/O and CPU stats is the Title Lane

PF Key shortcuts

Many actions can be done with the PF keys
If running under ISPF, in order to display what can you do with them you can use the PFSHOW command.
In order to hide the help you can use the PFSHOW OFF command and to modify the function key values you can use the KEYS command.

The PF3 key or the END command can be used to go 'up' a level, while the PF4 key or RETURN will immediately put you back at ISPF or TSO.

PF11 will scroll the columns, letting you see more information

HELP

Help specific to the panel you're at can be displayed by pressing the PF1 key.
If accessed through ISPF, you can also issue TUTOR in order to get an interactive tutorial on using SDSF.

The SET CURSOR command

The SET CURSOR command can be used in order to determine what happens to the cursors position after you press ENTER.

  • SET CURSOR OFF will place the cursor back on the command line each time you overtype and confirm with the ENTER key.
  • SET CURSOR TOP will place the cursor back on the command line, BUT it will also scroll the line that the command was entered on to the top
  • SET CURSOR ? will display a popup that lets you select an option in an interactive way
  • SET CURSOR ON will place the cursor on the same line that it was before you pressed the ENTER key to confirm overtyping. (back to the NP field for example)

The SET CONFIRM command

The SET CONFIRM command can be used in order to prevent commands that can purge jobs and output being issued accidentally.

After issuing SET CONFIRM ON, a confirmation popup will appear every time you issue a command such as CANCEL or PURGE.

Purging a job can be achieved by typing in P in the NP field on the line of a job.

SET CONFIRM OFF will disable the confirmation popup from appearing each time a dangerous command is entered while SET CONFIRM ? will allow you to check the status of the confirmation popup setting.

The SET BROWSE command

After tabbing over to an entry on the list and pressing ENTER, the default browsing action will happen.
This could be S (SDSF browse) ,SB (ISPF browse) or SE (ISPF edit)

The SET BROWSE ? command will display a popup menu that will allow you to define the default option for this situation
SET BROWSE NONE can be used to make it so no action is taken by deafult

The SET FFPS command

This command allows you to set the Point-and-shoot behaviour of the SDSF session (note that set screen is still used for the defaults)
For example SET FFPS ON will enable the point-and-shoot feature

The SET PAS command

This command is an alias for the SET FFPS command above, they act the same

The SET ACTION command

When displaying most of the SDSF screens you can type in a short command into the NP field (or as mentioned in previous section, just press enter)

In order to see what short commands can be entered in the NP field, you can use the SET ACTION ON command in the command line
There are a few variations of this command:

  • SET ACTION SHORT will display just the commands without their descriptions
  • SET ACTION LONG will also display the descriptions
  • SET ACTION ? will, as expected display a popup to interactively decide what you want to see
  • SET ACTION with no extra things after it will default to displaying the action characters
  • SET ACTION OFF will hide the extra information when you don't need it anymore

Invoking REXX on a SDSF row

By using the % character in the NP row, you can also invoke a REXX program on it.
You can specify the program to be ran (and any parameters to be supplied to it) directly in the NP field, or you can provide just the % character alone. This will display a popup that will let you populate the rest of the information.

Auto-refresh of the data

As you might know, pressing the ENTER key, will refresh the data visible on the screen.

The use of & character in the command line followed by a number of seconds will automatically refresh the values shown.
For example &10 will refresh the shown panel every 10 seconds.
The updates can happen between every 2 and 999 seconds.

This can be stopped by pressing the RESET key and PA1, (or if at a SNA terminal, the Attn key)

Entering JES / MVS commands from SDSF

Sometimes you might want to run a quick JES or MVS command while in SDSF.
This can be achieved, by prefixing the command with the / character typing it into the SDSF command line.

For example:
/D R,L
After executing the command, there should a confirmation of it in the top-right corner of the screen.
If you need to enter a command that is longer than the COMMAND line in SDSF, then you can put the + sign at the end of the command. This will display a panel that will allow you to extend the entered command.

Checking if you're authorized

If you enter a command, you might not receive the response you expect, or have an error message in the top-right corner.
If this happens, it might be because you're not authorized to use that command.
In order to display the commands you're authorized to use you can use the ```

QUERY AUTH

Another command that can be useful in checking your authorization, is the

WHO

command. This command will display the current version of several products associated with the data that is associated with what SDSF displays, as well as the group name linked to the security privileges that you have.